Description
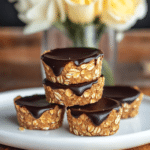
A creamy peanut butter oat layer topped with melted chocolate to make a tasty peanut butter chocolate treat that your whole family will love. These no-bake cups are easy to make and incredibly satisfying.
Ingredients
Scale
For the Peanut Butter Oat Base:
- 1 1/2 cups creamy peanut butter (not natural, see notes)
- 1 1/2 cups oat flour (see notes for how to make)
- 1/4 cup pure maple syrup (plus more if needed)
For the Chocolate Topping:
- 1 cup chocolate chips (semi-sweet, milk, or dark)
- 1 teaspoon coconut oil (optional, helps chocolate set smoother)
Optional Toppings:
- Flaky sea salt
- Sprinkles
- Mini chocolate chips
Instructions
- Prepare Muffin Pan: Line a standard 12-cup muffin pan with cupcake liners, or use a silicone muffin pan. Using liners or a silicone pan is highly recommended for easy removal.
- Prepare Peanut Butter Oat Base:
- Place the peanut butter and maple syrup in a medium-sized microwave-safe bowl. Microwave for 40-60 seconds, just until slightly warmed and easier to stir.
- Stir thoroughly until the peanut butter and maple syrup are completely combined and smooth.
- Gradually add the oat flour to the peanut butter mixture. Mix well with a sturdy spoon or spatula (or use a stand mixer with the paddle attachment). The mixture should be very thick but still easily moldable when pressed together.
- Check Consistency: If the mixture seems too dry and crumbly, add more maple syrup or peanut butter, 1 teaspoon at a time, until it holds together. (Optional: For a moister cup, you can add 1/4 – 1/3 cup of pumpkin puree).
- Press Base into Cups: Scoop the peanut butter oat mixture evenly into the prepared muffin cups (about 2-3 tablespoons per cup). Press the mixture down firmly with your fingers or the back of a spoon to create an even base layer.
- Make Chocolate Topping:
- Place the chocolate chips and coconut oil (if using) in a small microwave-safe bowl.
- Heat in 30-second increments at 50% power, stirring well after each interval, until the chocolate is completely melted and smooth.
- Add Chocolate Topping: Pour a layer of the melted chocolate mixture over the peanut butter oat base in each muffin cup. Smooth the top with the back of a spoon.
- Add Optional Toppings: If desired, sprinkle flaky sea salt, sprinkles, or mini chocolate chips over the melted chocolate layer before it hardens.
- Chill: Refrigerate the muffin pan for 2-3 hours, or until the peanut butter oat base and the chocolate topping are completely firm and set.
- Remove and Store: Carefully remove the set cups from the muffin pan (or liners/silicone cups). Store in an airtight container in the refrigerator for up to 5 days for best freshness.
Notes
- Peanut Butter: Use standard creamy peanut butter (like Jif or Skippy) for the best texture. Natural peanut butter may result in a drier, crumblier base.
- Oat Flour: To make oat flour, simply process old-fashioned rolled oats (not instant or steel-cut) in a food processor or high-speed blender until finely ground like flour. Measure after processing.
- Base Consistency: The base should be thick but hold together when pressed. Adjust with tiny amounts of maple syrup/peanut butter if too dry, or a tiny bit more oat flour if too sticky.
- Liners: Using paper or silicone liners is strongly recommended, as the cups can be difficult to remove cleanly from a bare muffin pan.
- Coconut Oil: Adding coconut oil to the chocolate topping is optional but helps create a smoother, slightly shinier finish and makes it a little easier to pour.
- Storage: Because these cups contain fresh ingredients like maple syrup and are not baked, they should be stored in the refrigerator.