Description
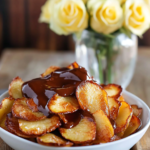
These oven-baked pear chips are a simple and healthier alternative to fried chips. Thinly sliced pears are baked until crisp and served with a delicious melted chocolate sauce for dipping.
Ingredients
Scale
For the Pear Chips:
- 2 firm Bartlett pears (or other firm pear variety)
For the Chocolate Dipping Sauce:
- 4 ounces milk or dark chocolate, chopped or chips
Equipment:
- Mandoline Slicer (recommended) or Sharp Knife
- Baking Sheet
- Parchment Paper
- Microwave-safe bowl or Double Boiler
Instructions
- Preheat Oven: Preheat your oven to 225°F (105°C).
- Prepare Baking Sheet: Line a large baking sheet with parchment paper.
- Slice Pears: Wash and dry the pears. Using a mandoline slicer (recommended for even thickness) or a very sharp knife, carefully cut the pears crosswise into very thin slices, about 1/8 inch (3mm) thick.
- Remove Seeds: Use the tip of a knife to carefully remove any seeds or tough core parts from the pear slices.
- Arrange on Baking Sheet: Place the pear slices in a single layer on the prepared baking sheet. Do not overlap them.
- Bake (First Side): Bake for 1 hour.
- Flip and Bake (Second Side): Carefully flip the pear slices over. Bake for another 30 minutes, or until the slices reach your desired crispness. Note: If the slices are thicker, or if you prefer very crispy chips, they may need up to an additional 30 minutes (total 1 hour on the second side). Check frequently towards the end.
- Cool Chips: Let the pear chips cool completely on the baking sheet or transfer them to a wire rack. They will crisp up further as they cool.
- Melt Chocolate: While the chips are cooling, melt the chocolate.
- Microwave: Place chopped chocolate or chips in a microwave-safe bowl. Heat in 30-second intervals at 50% power, stirring well after each interval, until melted and smooth.
- Double Boiler: Place chocolate in a heatproof bowl set over a saucepan of simmering water (do not let water touch the bowl). Stir until melted and smooth.
- Serve: Allow the melted chocolate to cool slightly. Serve the cooled pear chips with the warm chocolate sauce for dipping.
Notes
- Pears: Use firm pears that are not overly ripe. Bartlett, Bosc, or Anjou work well. Firmness is key for slicing thinly and achieving crispiness.
- Slicing: A mandoline slicer is highly recommended for getting consistently thin slices, which bake more evenly. Be very careful when using a mandoline.
- Baking Time: Baking time can vary significantly based on pear thickness, moisture content, and your oven. Check the chips regularly during the last 30 minutes of baking. They should feel dry and slightly leathery or crisp when done (they crisp more upon cooling).
- Chocolate: Use good quality milk or dark chocolate that melts well.
- Storage: Store cooled pear chips in an airtight container at room temperature for up to 3-4 days. Store leftover chocolate sauce covered in the refrigerator and reheat gently.