Description
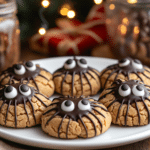
These Peanut Butter Spider Cookies are a fun and festive Halloween treat! Soft and chewy peanut butter cookies are topped with mini Reese’s Peanut Butter Cups and decorated with melted chocolate legs and candy eyeballs to create adorable (and delicious) spiders.
Ingredients
Scale
- 1/2 cup (1 stick, 113g) unsalted butter, softened to room temperature
- 1/2 cup (100g) packed light brown sugar
- 1/3 cup (67g) granulated sugar
- 3/4 cup (190g) creamy peanut butter (not natural, see notes)
- 1 large egg, room temperature
- 1 teaspoon vanilla extract
- 1 1/2 cups (188g) all-purpose flour
- 1 teaspoon baking soda
- 1/2 teaspoon baking powder
- 1/2 teaspoon salt
- Granulated sugar, for rolling (about 1/4 cup)
For Decorating:
- 24 mini Reese’s Peanut Butter Cups, unwrapped
- 1/2 cup semi-sweet chocolate chips
- Candy eyeballs (about 48)
Instructions
- Chill Reese’s Cups: Unwrap the mini Reese’s Peanut Butter Cups and place them in the freezer. This will help them hold their shape when pressed into the warm cookies.
- Preheat Oven and Prepare Baking Sheets: Preheat your oven to 350°F (175°C). Line baking sheets with silicone baking mats or parchment paper.
- Cream Butter and Sugars: In a large mixing bowl, using an electric mixer (hand mixer or stand mixer), cream together the softened butter, brown sugar, and granulated sugar until light and fluffy (about 1 minute).
- Add Peanut Butter, Egg, and Vanilla: Add the creamy peanut butter, egg, and vanilla extract to the creamed butter and sugar. Beat again, on medium speed, until well combined (less than 1 minute). Scrape down the sides of the bowl as needed.
- Combine Dry Ingredients: In a separate medium bowl, whisk together the all-purpose flour, baking soda, baking powder, and salt.
- Combine Wet and Dry Ingredients: Gradually add the dry ingredients to the wet ingredients, mixing on low speed or stirring with a spatula until just combined. Do not overmix.
- Shape and Roll Cookies: Using a small cookie scoop (about 1 tablespoon) or a spoon, scoop out portions of the dough. Roll each portion into a ball.
- Roll in Sugar: Roll each dough ball in granulated sugar until evenly coated.
- Arrange on Baking Sheets: Place the sugar-coated dough balls on the prepared baking sheets, leaving about 2-3 inches of space between each cookie.
- Bake: Bake for 8-11 minutes, or until the edges of the cookies begin to crack and turn lightly golden brown. The centers will still be soft.
- Add Reese’s Cups: Remove the baking sheets from the oven. Immediately press one frozen mini Reese’s Peanut Butter Cup into the center of each warm cookie.
- Cool: Let the cookies cool on the baking sheets for 15-20 minutes. Do not move the cookies while they are still very warm, as the Reese’s Cups will be soft and may sink or lose their shape.
- Melt Chocolate: While the cookies are cooling, melt the semi-sweet chocolate chips. Place the chocolate chips in a microwave-safe bowl. Microwave on 50% power in 30-second intervals, stirring after each interval, until the chocolate is completely melted and smooth.
- Decorate (Spider Legs): Transfer the melted chocolate to a small resealable plastic bag (or a piping bag). Snip off a very small corner of the bag. Pipe four “legs” on each side of the Reese’s Peanut Butter Cup on each cookie to create spider legs.
- Add Eyes: Use a tiny dab of the melted chocolate to attach two candy eyeballs to the top of each Reese’s Peanut Butter Cup.
- Let Chocolate Set: Allow the melted chocolate to set completely before serving or storing.
- Serve
Notes
- Peanut Butter: Use regular creamy peanut butter (like Jif or Skippy), not natural peanut butter. Natural peanut butter can be too oily and may cause the cookies to spread too much.
- Room Temperature Ingredients: Using room-temperature butter and eggs helps the ingredients emulsify properly.
- Freezing Reese’s Cups: Freezing the Reese’s Peanut Butter Cups before pressing them into the warm cookies helps them maintain their shape.
- Baking Time: The baking time may vary slightly depending on your oven.
- Melting Chocolate: Be careful not to overheat the chocolate, or it may seize up. Microwave in short intervals and stir well after each interval.