Description
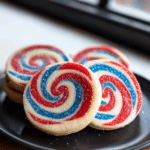
These festive Red, White, and Blue Pinwheel Icebox Cookies are perfect for patriotic holidays like the 4th of July, Memorial Day, or any occasion where you want a colorful and delicious treat. These slice-and-bake cookies feature a vibrant swirl of red, white, and blue dough.
Ingredients
- 3 cups (375g) all-purpose flour, plus more for dusting
- 1/2 teaspoon baking powder
- 1/2 teaspoon salt
- 1 cup (2 sticks, 226g) unsalted butter, softened to room temperature
- 1 1/3 cups (267g) granulated sugar
- 2 large eggs, room temperature
- 2 teaspoons pure vanilla extract
- Red gel food coloring
- Blue gel food coloring
Instructions
-
Combine Dry Ingredients: In a medium bowl, sift together the all-purpose flour, baking powder, and salt. Whisk to combine thoroughly. Set aside.
-
Cream Butter and Sugar: In the bowl of a stand mixer fitted with the paddle attachment (or in a large bowl using a hand mixer), beat the softened butter until smooth and creamy, about 2 minutes.
-
Add Sugar: Gradually add the granulated sugar to the butter. Continue beating on medium-high speed until the mixture is light and fluffy, about 3 minutes.
-
Add Eggs and Vanilla: Add the room-temperature eggs one at a time, beating well after each addition until fully incorporated. Stir in the vanilla extract.
-
Combine Wet and Dry Ingredients: With the mixer on low speed, gradually add the dry ingredients (flour mixture) to the wet ingredients, mixing until just combined. Do not overmix.
-
Divide and Color Dough: Divide the dough into three equal portions.
-
Keep the white: Keep the first portion
-
Color Dough (Red): Return one portion of the dough to the mixing bowl. Add red gel food coloring, a little at a time, and mix on low speed until the dough reaches your desired shade of red. Start with a small amount of food coloring and add more as needed.
-
Shape and Wrap Red Dough: Shape the red dough into a 4×4-inch square. Wrap it tightly in plastic wrap and refrigerate.
-
Clean Bowl: Thoroughly clean the mixing bowl and paddle attachment to remove any traces of red food coloring.
-
Color Dough (Blue): Place the final portion of dough in the clean mixing bowl. Add blue gel food coloring, a little at a time, and mix on low speed until the dough reaches your desired shade of blue.
-
Shape and Wrap Blue Dough: Shape the blue dough into a 4×4-inch square. Wrap it tightly in plastic wrap and refrigerate.
-
Shape and Wrap White Dough:
-
Chill Dough: Refrigerate all three squares of dough (red, white, and blue) for at least 30 minutes. This makes the dough easier to roll out.
-
Roll Out Dough (One Color at a Time):
- Remove one square of dough (e.g., red) from the refrigerator.
- Place the dough between two sheets of wax paper.
- Roll the dough out into a rectangle about 1/8-inch thick. Aim for a roughly uniform rectangle, but the exact dimensions aren’t critical at this stage.
- Repeat this process with the white and blue dough, rolling each color out separately between sheets of wax paper.
-
Stack Dough Layers:
- Carefully peel off the top layer of wax paper from the red dough rectangle.
- Peel off the top layer of wax paper from the white dough rectangle.
- Carefully flip the white dough rectangle on top of the red dough rectangle, aligning the edges as best as possible. Peel off the remaining wax paper from the white dough.
- Peel off the top layer of wax paper from the blue dough rectangle.
- Carefully flip the blue dough rectangle on top of the white dough rectangle, aligning the edges. Peel off the remaining wax paper from the blue dough.
-
Roll Layers Together: Use a rolling pin to very lightly roll over the stacked dough layers, just to help them adhere to each other.
-
Roll into a Log: Starting at one of the shorter ends of the rectangle, tightly roll the dough into a log.
-
Wrap and Chill Log: Wrap the log tightly in wax paper, and then wrap it again in plastic wrap. Refrigerate for at least 1 hour.
-
Prevent Flat Side (Important): After 1 hour, remove the dough log from the refrigerator. Roll it on the counter several times to help maintain its round shape and prevent it from developing a flat side. Alternatively, you can stand the wrapped log upright in a tall glass in the refrigerator.
-
Chill Again: Return the dough log to the refrigerator and chill for at least 4 more hours, or preferably overnight. The dough must be very firm for slicing.
-
Preheat Oven and Prepare Baking Sheets: When ready to bake, preheat your oven to 350°F (175°C). Line two baking sheets with parchment paper.
-
Slice Cookies: Remove the chilled dough log from the refrigerator. Unwrap it. Using a sharp knife, slice the log into 1/4-inch thick rounds.
-
Arrange on Baking Sheets: Place the cookie rounds on the prepared baking sheets, leaving about 2 inches of space between each cookie.
-
Bake: Bake for 9-11 minutes, or until the edges are pale golden brown. The cookies will not brown much.
-
Cool: Let the cookies cool on the baking sheets for a few minutes before transferring them to a wire rack to cool completely.
Notes
- Room Temperature Ingredients: Using room-temperature butter and eggs helps the ingredients emulsify properly.
- Gel Food Coloring: Gel food coloring is recommended for the most vibrant colors. Use no-taste red food coloring to avoid altering the flavor of the cookies.
- Chilling Dough: Chilling the dough is essential for making these cookies. It makes the dough easier to handle, prevents it from spreading too much during baking, and helps the colors stay distinct.
- Rolling Dough: Rolling the dough between sheets of wax paper prevents it from sticking and makes it easier to handle.
- Slicing Dough: Use a sharp knife to slice the chilled dough log into even rounds.
- Baking Time: The baking time may vary slightly depending on your oven.
- Serving Suggestions: Enjoy!
- Storage