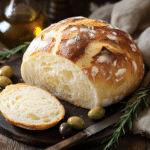
Description
This Rustic Italian Crusty Bread recipe is surprisingly easy, requiring no kneading! With just a few simple ingredients and a long rise, you can achieve a beautiful, crusty loaf with a soft, airy interior, perfect for dipping, sandwiches, or enjoying on its own.
Ingredients
- 3 1/4 cups (406g) all-purpose flour, plus more for dusting
- 1 teaspoon fine sea salt (see notes)
- 1 1/2 cups warm water (100-110°F / 38-43°C)
- 2 teaspoons instant yeast (or active dry yeast, see notes)
- Semolina Flour or Cornmeal
Instructions
-
Combine Dry Ingredients: In a large mixing bowl (or the bowl of a stand mixer), combine the all-purpose flour, salt, and instant yeast (or active dry yeast). Whisk or stir with a spatula to distribute the ingredients evenly.
-
Add Water: Pour the warm water into the bowl with the dry ingredients.
-
Mix Dough: Using a spatula or the paddle attachment of a stand mixer, mix the ingredients until a shaggy, sticky dough forms. Make sure all the flour is incorporated and there are no dry spots. The dough will be quite wet and sticky; this is normal for a no-knead bread.
-
First Rise (Bulk Fermentation): Cover the bowl loosely with plastic wrap and a clean kitchen towel. Let the dough rise in a warm place for 2-3 hours, or until it has doubled in size. Note: If your kitchen is cold, you can preheat your oven to the lowest setting for a few minutes, then turn it off and place the covered bowl inside to rise.
-
Shape Dough: After the dough has doubled, generously dust a large piece of parchment paper (or your countertop) with flour. Gently scrape the dough out of the bowl and onto the floured surface. The dough will be very sticky, so flour your hands well. Gently shape the dough into a round or oval loaf by folding the edges of the dough up and over towards the center. Do not knead the dough.
-
Flip and Rest: Carefully flip the loaf over so that the floured side is on top and the seam side is down. Place the loaf (on the parchment paper if using) on a pizza peel, a large cutting board, or another flat surface that will allow you to easily transfer it to the oven. Let the dough rest, uncovered, while the oven and pizza stone/Dutch oven preheat.
-
Preheat Oven and Pizza Stone/Dutch Oven: About 30-60 minutes before you’re ready to bake, preheat your oven to 450°F (230°C). Place a pizza stone or a Dutch oven (with its lid on) inside the oven while it preheats. This is crucial for creating a crispy crust.
-
Create Steam: Place an oven-safe bowl or pan on the bottom rack of the oven. Fill it with about 2 inches of water. This will create steam during baking, which contributes to a crisp crust.
-
Score Dough (Optional): Just before baking, use a very sharp knife or a clean razor blade to score the top of the loaf. Make a few slashes, about 1/2-inch deep, across the top. This helps control the expansion of the bread during baking.
-
Bake (Pizza Stone Method):
- Sprinkle the preheated pizza stone with semolina flour or cornmeal (this helps prevent sticking).
- Carefully slide the loaf (on the parchment paper, if using) onto the hot pizza stone.
- Bake for 30-45 minutes, or until the bread is a deep golden brown and the internal temperature reaches 200-210°F (93-99°C).
-
Bake (Dutch Oven Method):
- Carefully remove the very hot Dutch oven from the preheated oven. Remove the lid.
- Carefully lower the loaf (on the parchment paper) into the hot Dutch oven.
- Cover the Dutch oven with its lid.
- Bake for 30 minutes, covered.
- Remove the lid and continue baking for another 5-15 minutes, or until the crust is a deep golden brown and the internal temperature reaches 200-210°F (93-99°C).
-
Cool: Carefully remove the bread from the Dutch oven or pizza stone (using the parchment paper as handles, if using) and transfer it to a wire rack to cool completely before slicing. Cooling completely is important for the texture. You can also let it cool inside the oven with the door slightly ajar.
Notes
- Water Temperature: The water should be warm to the touch, but not hot (100-110°F / 38-43°C).
- Yeast: You can use instant yeast or active dry yeast. If using active dry yeast, you do not need to proof it separately; it can be added directly to the dry ingredients.
- Salt: Non-iodized salt is preferred for bread baking. If using table salt (iodized), you might want to use slightly less.
- Flour: All-purpose flour or bread flour can be used. Bread flour will result in a slightly chewier loaf.
- Rising Time: The rising time can vary depending on the temperature of your kitchen.
- Dutch Oven/Pizza Stone: A Dutch oven or pizza stone is essential for creating the crispy crust. The preheated surface helps to create a burst of steam when the dough is added, resulting in a crispier crust and a better rise.
- Scoring: Scoring the loaf (making slashes on the top) is optional, but it helps control the expansion of the bread during baking.
- Cooling: Cooling the bread completely before slicing is crucial. This allows the internal structure to set and prevents a gummy texture.
- Storage: Store at room temperature.